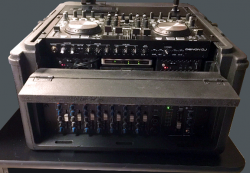
Reworking My Large System

To many ads? Support ODJT and see no ads!
Had a little time this afternoon, so I decided to do a little painting. Not windy today, but man is it HOT! Got the back side of the Facade frame painted black, and three of the four panels painted white. One more panel to paint and I think I'll call it quits until later this evening.

I haven't finished the height extension (high heels) on the bottom rack yet. I was looking it over and I'm not in love with what I've done so far, which is kinda why I stopped work on it and worked on the mods to the top rack instead. But now the top rack is done and I need to decide what I'm gonna do with the High Heels. I know there's a few of you giving me a hard time about the time this thing is taking.[emoji1] I'd like to see it finished too, but I also want it done right because this will be my main system for perhaps a year... maybe more. Anyway, it's not a race; it's a DIY project.[emoji1] I could probably make the High Heels look and work OK... I just can't decide if OK is OK.[emoji1]

I want to finish the painting today, though. If everything is painted, I can work on the Facade inside where it's cool. Looks like I'm gonna run out of Black Paint again. Guess it's back to the home improvement store.[emoji1] It surprises me how little actual area a can of spray paint covers.[emoji4]

You should use it for at least as long as it took to build it
 
Only got one Facade frame painted front and back before I ran out of (black) paint. The others are only painted on one side. I was able to paint all the Facade panels just before I ran out of white paint too. I even got the foam glued to one of the panels. Maybe I can get one panel covered in the faux leather tonight. I'm pretty excited to see what the Facade is gonna look like.

I brought the slant-top rack inside so I can put the rest of the components in it. If I had continued to work on it in the garage it was gonna take a LONG time to get it finished up... just too hot to work out there if I can avoid it. Hard to believe in only a month's time, we went from too cold to too hot! What the heck happened to SPRING???[emoji1] We got one, but it only lasted two days.[emoji1]

Right now I'm trying to mount the dimmer switch for the LED light bar (which I mounted inside the rack). If I can get that hooked up, I'm hoping it will provide some good light so I can wire up all the connections. Stuff is happening.[emoji4]I'll take some progress pics and post 'em tomorrow.[emoji4]
 
  • Like
Reactions: ittigger
You should use it for at least as long as it took to build it

Hmmmm???[emoji848] I'll have to think about that???[emoji1] I guess it really depends on whether this one meets all of the original objectives... Ya know I didn't just start this project because I was bored or because I wanted to start a DIY thread on a DJ forum?[emoji1] My previous Large System worked fine, but I couldn't lift it by myself, and I wanted to reduce my setup time. The split (two piece rack) design seemed like the best solution. I think it IS a good solution.[emoji4] I'm not sure how much, if any, this new system is gonna reduce my setup time. I won't know that until it's done and I practice setting up.

If I DO build a new Large System, I think I have an idea for a MUCH different design than your standard rack setup, and THAT I might just build for fun.[emoji1]

Got more paint this morning, so my main objective for today is to get all my painting done as early as possible, and then I have one piece I need to fabricate for the High Heels before I can finish that build. I decided to go ahead and finish it up in order to complete the project. Since the High Heels just bolts to the bottom of the base rack, I can always build an improved version later, and just swap it out.[emoji4]
 
  • Like
Reactions: ittigger
Hmmmm???[emoji848] I'll have to think about that???[emoji1] I guess it really depends on whether this one meets all of the original objectives...

I see the re-re-work gears turning ... :)
 
We've gone from this...

1527621944875.png

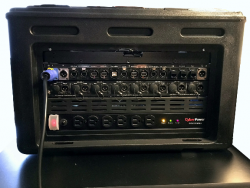
...to this...

1527621971465.png

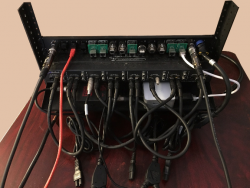
The rear rack slides in from the top (with a little twisting and turning) and connects to the rim around the rear opening, so it stays in place and still allows the rear cover to fit. I think it looks pretty good, and it should be pretty functional. It's not much different from the rear of my old Large system...

1527622254523.png

... Just more compact. Does anybody really care how neat your rear rack panel looks??? Probably not... especially if it's covered by a facade. I CARE, though![emoji23] The biggest down side to this design is the fact that the screws used to mount the components on the rack are inaccessible without removing the rack. To remove or install the rear rack pretty much requires that everything else is removed from the rack first. On the plus side, you don't see any rack screws.:djsmug: I don't expect to have to make a lot of changes to the rear panel, though (hope I'm right), so I think the rear rack is done... well, except I see a screw that needs a little touch-up paint.[emoji23]
 
Last edited:
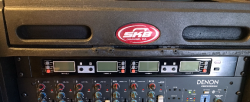
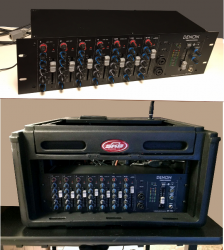
The next module to go in the rack is the Denon DN-410X mixer...

1527649158034.png

Pretty straight-forward hooking up this mixer; just a lot of cables. At least it uses a standard IEC power cord, so I was able to use a short one. Unfortunately, just about every other electrical component has a custom power cord or power block, which have long cords I don't need. So I have to wind up several feet of cable, which adds weight and takes up space, and is also difficult to manage... looks like spaghetti!:laugh:... Not too thrilled with all the cords, but I use short ones every place I can.
 
  • Like
Reactions: ittigger
Where's the power cord for the GTD Audio B-33???... Oops... it's plugged into the D-Link switch, and it's already zip-tied down... CR@P![emoji1] When I took the components, cables, and cords out of the old rack, I didn't bag and label them like I should have. I thought I'd be able to remember where I put everything and that I'd recognize each item, and I might have if I was putting them in the new rack the next day; not 4 months later.[emoji1] I had no idea it would take this long. Can't find my microphone cord... I was sure I had a short one, but I can't find it. Maybe it's out in the Gig bag, in the minivan. I hope so, otherwise I'll be ordering another one. GEEZ!!![emoji1] I seem to spend twice as much time looking for stuff I know I have, than actually doing anything.[emoji1] No wonder it's taking SO long to get this thing done.[emoji1]
 
  • Like
Reactions: ittigger
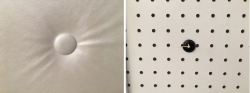
Got ONE of my Facade panels covered yesterday. Not gonna post a pic of it though. It'll be a surprise.[emoji1] I can see why these things cost SO much to buy, though. They are NOT that easy to make, and the materials aren't cheap either. Attaching the faux leather is pretty easy, but the corners are a PITA. And of course if you're OCD, there can't be any folds showing.[emoji1] And the buttons!!!... Have you ever tried covering buttons in a thick (leather like) material???... I ruined two buttons and the little plastic piece you use to press the backs onto the covered button.[emoji1] I found a more sturdy replacement... the cap to a baby aspirin bottle; perfect size.[emoji1] And attaching the buttons... also a little tricky. I used peg board on the back of my panels expecting the holes would be PERFECT for attaching the buttons... NOPE![emoji1] Not even one hole lined up with where I wanted to attach a button... had to drill SPECIAL holes for each button. Then getting the tension even for every button took a couple of tries.[emoji1] It took me a couple of hours, but now I think I have a bit of a system, so the rest of the panels should go a little quicker... I HOPE![emoji1]


Sent from my iPhone using Tapatalk
 
Last edited:
  • Like
Reactions: ittigger
Got ONE of my Facade panels covered yesterday. Not gonna post a pic of it though. It'll be a surprise.[emoji23]
OK... Just a tease, then.[emoji23]

1527696428851.png

... Front side, and back side. Maybe not the best project for someone as picky as I. I had to remove a lot of staples and restaple several times before I finally got the faux leather to lay the way I wanted, and I just redid the above button for the third time in order to get it to the same tension as the other bottons on the panel. It's a little work, but I think it's gonna look nice.:djsmug:
 
Last edited:
You could've gone in with Mix to his "guy" and had them wrapped instead ... maybe getting a partner discount.
 
The next module is in... The GTD Audio B-33 Wireless Microphone System...

1527701621543.png

I like that it's about the same depth as the Denon Mixer... makes hooking up wires a breeze. Too bad this GTD B-33 will probably be replaced soon. I need a new Wireless Mic system for my Small System, so I'll probably buy a new one for this Large System and pass this one down to the Small System.

I wish it was not SO high in the rack that it's blocked by the (open) Keyboard Shelf, but I decided I really use the volume controls on the mixer (channels 1-4) more than I use the controls on the GTD System. Being able to see the mixer is more important. I have to remind myself that both components are actually a little higher to the reach in this new system than they were in the old rack when it was under my table...

1527701592704.png
 
  • Like
Reactions: ittigger
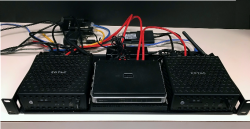
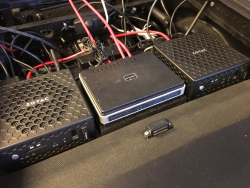
In goes the Computer Shelf...

1527714910073.png

... Of all the things I've done on this project, this one might have turned out the best. I love the Nano computers, and I love how they are situated on a standard 8" rack shelf, which simply slides down in a couple of custom brackets...

1527715064396.png
... and locks into place once the controller is screwed into place in the slant-top rack above. The wiring looks a little daunting, but it's not too bad... just a lot of it. With all these wires, I can't comprehend how anyone can connect all their gear live at a gig, without having a WIRING mess to deal with. I guess some do, but the pre-wired rack is the only way to go for me.

1527715741176.png

Now for the bad news... I have two audio cables from the mixer to the Secondary computer, but the ports they need to connect to are on the front of the Nano PC. I can either use 90 degree audio cables (or adapters), which I DON'T currently have, OR... I can use a USB Soundblaster card (which I DO have) and attach it to the rear if the computer and plug the cables into the Soundblaster. I had not tested that previously, so I'll have to make some configuration changes and load a little more software on the computer to make it work, but I think I'll do the latter.:djsmug:
 
Time to re-do them then ...
 
  • Like
Reactions: DJ Bobcat
Time to re-do them then ...

Nope[emoji1]... that would be just a little extreme. I have to have an audio out from the secondary computer to use it as a backup for my main computer, unless I want to switch the controller USB cable to it. But switching to USB audio usually requires a reboot, so not a quick switch over.

The audio in my Nano computers is pretty good, but the USB Soundblaster should sound even better.[emoji4]


Sent from my iPhone using Tapatalk
 
Last edited:
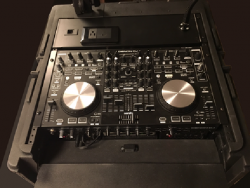
Gettin' pretty close on the top rack. The last module to go in is the Denon MC6000 MK2...

1527735557610.png

It has been in the rack dozens of times, so not much question it's gonna fit.[emoji4]Only 5 cables/wires and the power cord to plug in to hook it up... not much effort, really. The wiring is still a bit of a mess, so I need to work on that a bit. Also, I need to get the monitors out of the minivan so I can start testing.:djsmug:

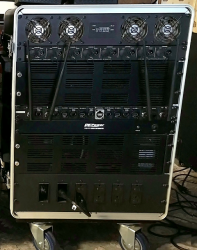
Now I need to wrap up the bottom rack mods. Still have a piece to fabricate, and some finishing work to do, but not a lot of work left to do.

I didn't get much done today on the Facade. I had hoped to cover another panel, but all I got done was gluing the foam padding to one panel, and I made another button... one button.:laugh: I thought I had finished the painting, but I still have some touching up to do on one section. However, I'm pretty close to being able to put the frame together.

It's gettin' there. Will it be finished in May???... Nope.[emoji1] Tomorrow is haircut, grocery shopping, and lawn mowing day. Life doesn't stop for me to finish my DJ rack.:laugh:

And it's in...

1527739084490.png

1527739099042.png
 
Last edited: