Reworking My Large System

To many ads? Support ODJT and see no ads!
... Next up is the LED light. Unlike @Ausumm, I'm mounting my light (same light) INSIDE the rack, so I'll have a built-in light if I need to look at the wiring inside the rack...

And.... It's installed (view from inside the rack, looking up)...
1526690876059.png
... Just barely fits to the side of the bolt that holds the monitor mount, but BARELY is good enough![emoji23]... When it barely DOESN'T FIT... that's when you got problems. I gotta say; for not having measured the space where I mounted it, it really worked out nicely. Now I need to figure out where to mount the dimmer switch.:)
 
Last edited:
  • Like
Reactions: ittigger
... Now I need to figure out where to mount the dimmer switch.:)
I was just sittin' here, watching TV, and mindin' my own business... when it suddenly came to me.[emoji1] Now I know where to mount the dimmer switch. I got the PERFECT place for it, and it will be easy. I'm gonna mount it on the back side of the Antenna Slider mount. I've been working on that Slider off and on all day, and it's getting close. It would be closer if I'd leave it alone until the paint dries, but I keep messing with it before it's dry, and I have to (sand it and) repaint it... which I think I've done no less than four times. But I'm trying to get four 10" antennas in a 12" by 4" by 1" space in a way that allows them to be pointed upward when the Slider is pulled out of the back of the rack. And... it can't block the other gear mounted in the rear rack. All the parts are made and painted, but it has never actually been assembled... I've tried to assemble it, but I keep messing up the paint.[emoji1]

Wish I could put more time in on this project. Working for an hour or two a day, then having to clean up and put everything away makes it tough to get much done. It's not like this is the ONLY thing I have going.[emoji4] Along with my routine domestic chores, I'm also helping get my daughter's house ready for sale. I think both projects are gonna wind up at about the same time.[emoji4]
 
Last edited:
It's back to the daughter's house today, but before leaving I attempted to put the Antenna Slider together. I DID get most of it together, but got the screws a little too close to the edge of the bottom piece and split the wood.[emoji37] So I had to glue and clamp that up before proceeding. Since I'll be working on my daughter's house all day, the glue on the Antenna Slider will have plenty of time to dry. So I still haven't been able to set it in the rack to see how it's gonna fit. Tomorrow, I guess; or maybe this evening. The extra hours of daylight sure do help.[emoji4]


Sent from my iPhone using Tapatalk
 
  • Like
Reactions: ittigger
It's back to the daughter's house today, but before leaving I attempted to put the Antenna Slider together. I DID get most of it together, but got the screws a little too close to the edge of the bottom piece and split the wood.[emoji37] So I had to glue and clamp that up before proceeding. Since I'll be working on my daughter's house all day, the glue on the Antenna Slider will have plenty of time to dry. So I still haven't been able to set it in the rack to see how it's gonna fit. Tomorrow, I guess; or maybe this evening. The extra hours of daylight sure do help.[emoji4]

I got the Antenna Slider put together... It seems to function as it was designed, but I don't know?[emoji848] Do you remember that game "Mouse Trap"?[emoji1] This Slider kinda reminds me of that game. It's not that it was not well constructed, it's just a lot of parts... a contraption.[emoji1] It's gonna be hidden inside the rack until it's pulled out, and then it will be behind my facade, so I guess if it works, I'll just go with it. Got a couple of small adjustments to make and some screw heads to paint. After that, I'll post a picture of it.[emoji4]... Then you guys can criticize it and laugh at me.[emoji1]... Or criticize me and laugh at it.[emoji1]
 
  • Like
Reactions: ittigger
I got the Antenna Slider put together... It seems to function as it was designed, but I don't know?[emoji848] Do you remember that game "Mouse Trap"?[emoji1] This Slider kinda reminds me of that game. It's not that it was not well constructed, it's just a lot of parts... a contraption.[emoji1] It's gonna be hidden inside the rack until it's pulled out, and then it will be behind my facade, so I guess if it works, I'll just go with it. Got a couple of small adjustments to make and some screw heads to paint. After that, I'll post a picture of it.[emoji4]... Then you guys can criticize it and laugh at me.[emoji1]... Or criticize me and laugh at it.[emoji1]
We're all waiting for you to decide to redo everything ...
 
  • Like
Reactions: ittigger
We'll see???[emoji1]... If it looks like crap, that's exactly what I'm gonna do.[emoji1]


Sent from my iPhone using Tapatalk

You certainly wouldn't be the first! :sick:
 
Ummm....I'll believe that when it really happens. I forsee a few more attempts...:)
LOL... Nope... It's installed (the Keyboard Shelf).

So I said it was installed for the last time, but I never said I was done messin' with it. I wasn't entirely happy with the front. My attempts at fake texture looked just that... FAKE. Today I sanded down the roughest areas and repainted, and while it's not perfect, I think I can live with it... I THINK???[emoji1]

1526950662441.png

The areas around the hinges are never gonna look very good. Not much more I can do with that area at this point without completely starting over.:) If I filled and sanded over the screws for the hinges, the Keyboard Shelf really would be permanent. Even though I said it was installed for the last time, I'm not sure I'm ready for permanent.[emoji1]

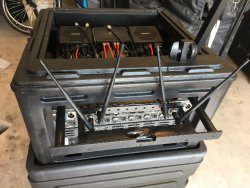
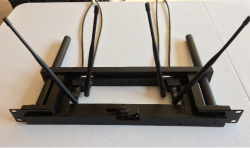
Today actually went pretty good... Started a little later than I expected; basically because I was feelin' lazy.[emoji1] However, in addition to getting the front of the keyboard Shelf sanded and repainted (a few times [emoji4]), I also finished up the Antenna Slider. So here it is...
1526950677512.png

Yes... It is a CONTRAPTION[emoji23], but it just might work. I still haven't been able to fit it in the rack yet, because it attaches to the top 1U of the rear rack, and I haven't been able to install the rack because I've been painting the keyboard shelf.

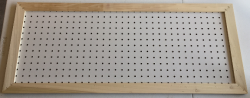
I was also able to assemble my four facade panels. I cut the pieces several days ago, so today the panels went together pretty quickly (and easily). This is the back side, which will face the DJ Booth...
1526950697400.png

There's about 20 screws on the other side, holding the raw wood to the peg board. I decided on peg board for it's lighter weight for it's thickness, yet still pretty strong. The raw wood frame adds additional strength and gives me a good surface for attaching the covering. It needs to be painted white before the panels are covered. These panels will be covered with a faux leather in off-white. The panels will be removable, so I can make white ones, black ones, or lighted ones, or any other color or type I choose. Next up is the folding frame. Should be pretty easy too, because I already cut the pieces. I made the panels first because I can cover them in the house, in the evening, whereas the other tasks need to be done in the garage.

 
Last edited:
  • Like
Reactions: steve149
It's not going QUITE as smoothly today. I've spent the last hour or so fitting the Antenna Slider in the rack. It fits, but not without some adjustments. With the Slider in the top of the rear rack, the little twist locks on the rear cover can't latch onto the plastic rim around the opening. Not an insurmountable problem (I'll get to the solution momentarily).

The biggest problem is the Computer Shelf. I was finally able to set the Computer Shelf AND the Slider both in the rack at the same time. The Computer Shelf backs right up to the Slider, preventing the Slider from closing completely... It's about an inch too long. There's no adjustment possible on the computer shelf, but I CAN shorten the two rods on each side of the Slider, but of course I'll loose an inch of travel. Nevertheless, that's what must be done.

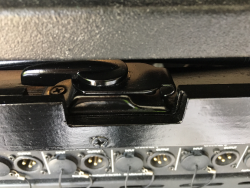
As for the rear cover... There's a latch on it that's designed to attach to the Facade I'm building. Without giving too much away, the Facade will attach to the rack at the bottom and the top and will appear to float. It will LATCH at the top to the Antenna Slider. By loosing the inch of travel in the Slider, the Facade will be an inch closer to the rack. I think I'll still have four or five inches, but I originally wanted six-seven. I think it will still leave plenty of room for wires to hang between the two racks (top and base) with a little space to slip my hand back there in case some wire needed to be moved.:djsmug: I attached a catch on the back of the cover, and use the same latch on the Slider to attach the cover. Cleaver, huh?:djsmug: Here's what the latch looks like...
1527017221539.png

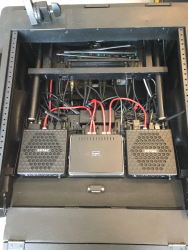
Here's the Computer Shelf and the Antenna Slider installed inside the rack...

1527017294487.png

Hopefully, I can get the cables a little better organized once I hook everything up.:)
 
Last edited:
  • Like
Reactions: ittigger
The first photo looks like you added a window to your system.
 
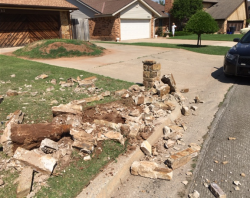
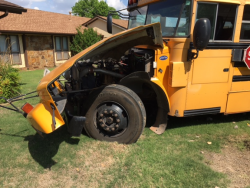
Ya just never know what's gonna happen... I was out in the garage working on my project, watched a school bus drive by and BAMMMM!!!! I heard a loud CRASH, and I went running up the street toward the bus that crashed into a brick mailbox and came to rest in the yard of a house just three houses away....

1527026688752.png

I was the first one on the scene, and opened the back Emergency Door, and helped about 15-20 kids off the bus. Unfortunately, there were fatalities...

1527026875246.png

... the mailbox...

1527026900825.png

... and the bus.:laugh:

One little girl (middle school students) had two cuts on her leg, but none of the other kids were injured. The paramedics didn't even treat the little girl's cuts.
 
Last edited:
Is that house growing a lawn on their driveway?
 
next up .. motorizing it ...
 
Got just one Facade frame made this evening. The frames hinge together to hold the facade panels... The plan is to have a folding frame with removable panels, but the panels would not be removable at the gig. You'd put the panels on with screws before going to the gig. I'm not planning to carry extra Facade panels around.[emoji4] The first frame took 35-40 minutes to assemble. The pieces were already cut. They went together perfectly with L brackets, glue, and one long screw in each corner. They're EXTERMLY sturdy!

I'm pretty happy overall with the progress today, despite the bus crash.[emoji4]
 
Last edited:
  • Like
Reactions: ittigger